A mismanaged drywall installation can result in an ugly look and structural problems that may require costly repairs. Hire a top-rated pro to avoid these consequences.
Properly cutting drywall and using corner beads ensure clean, crisp corners. Adding this to the interior and exterior corners will help the drywall withstand stress and abuse over time. Contact Drywall Installation Las Vegas now!
Drywall is a versatile wall and ceiling material that can be customized to fit each homeowner’s needs. It is lightweight and durable and provides natural fire resistance and soundproofing. It also offers a strong base for tile, stucco, or shiplap walls and can help homeowners save money on utility bills. However, the drywall cost can add up quickly, especially for large rooms or multiple projects. Fortunately, there are ways to reduce the costs of drywall installation.
Several factors determine the overall cost of drywall installation, including the panels’ type and thickness, the room’s size, and other materials and labor. The average cost for a sheet of drywall is $0.40 to $0.65, with thicker, more specialized types typically costing more. Purchasing drywall in bulk can reduce the per-panel cost, and some contractors offer discounts for larger orders.
The thickness of the drywall can also increase the price, as thicker panels are more difficult to work with and require more labor to hang. Likewise, a home’s age can affect the cost of installing new drywall, as older homes may have lead paint or asbestos in the walls that need to be removed before hanging new drywall.
Other costs that need to be considered include local material and equipment delivery and service provider transportation expenses to the job site. In addition, homeowners can expect to pay for a general contractor’s overhead and markup for organizing and supervising the project.
Finally, a homeowner can expect to pay for the cost of any insulation required to maintain the energy efficiency of the space. This is particularly true for older homes that will need to be brought up to code to comply with current building standards.
In order to keep the cost of drywall as low as possible, it is important for homeowners to shop around and find an affordable, experienced contractor. Additionally, homeowners can save on drywall installation by purchasing their supplies in bulk from a specialized supplier. These suppliers are familiar with their products and can help homeowners estimate their requirements accurately.
Materials
A drywall contractor can purchase materials in bulk at a discount from a distributor and save money. Homeowners can also purchase supplies from a home improvement store or online. However, it’s usually best to buy from a drywall supplier since the staff knows the product better and can help with estimations. It’s also better to purchase quality products instead of a bargain basement brand that will be less expensive up front but may need to be replaced or repaired more frequently.
Drywall materials include gypsum, paper tape and drywall mud. The mud, or joint compound, is made from powdered gypsum with latex or vinyl binders. It’s used to join drywall sheets, fill joints and cover screw holes. The paper tape is embedded in the mud and helps ensure a smooth, strong connection. It’s available in different thicknesses, including 1/2-inch and three-eighths-inch varieties. The latter are often used for curved walls or for patching older plaster walls.
Several types of drywall are available, including fire-resistant and water-resistant varieties. They can also offer insulation and soundproofing benefits. Some varieties have additional features such as decorative finishes, shiplap designs and tile backing. Homeowners can choose from a wide variety of colors and textures, as well as different finishes for ceilings and walls.
To prepare for a drywall project, homeowners should clear out the area and move items to other rooms. The process is messy, and debris can damage surfaces, furniture or other decorations. It’s also important to protect flooring and furniture by covering them with plastic sheeting.
The drywall installation process can be costly, but it’s a worthwhile investment in the comfort and safety of a home. It can also help reduce energy costs. The insulated walls can keep interiors cooler in summer and warmer in winter, saving on heating and cooling expenses.
A drywall project requires some basic tools, including a tape measure and a power drill with a drywall bit. Other essentials include a miter saw, which makes it easier to make angled cuts, and a level, which ensures surfaces are straight and even.
Preparation
Drywall installation is a common and important home improvement project. It is also a complex job that requires proper planning and preparation. The process of preparing for drywall installation involves cleaning and clearing the space, making necessary repairs, and covering items that can be damaged by dust. This preparation can save you time and money and ensure the quality of your finished product.
Dry gypsum is highly susceptible to moisture. It can soften and turn into a gooey paste if exposed to water for prolonged periods of time, such as during a flood or hurricane. Additionally, the paper facings and organic additives in drywall make it a good food for mold. Therefore, it is crucial to properly install and maintain drywall, particularly in areas of the home that are prone to moisture or high humidity.
In addition to avoiding moisture damage, it is essential to properly install and paint drywall. This process will protect the wall and extend its lifespan. The first step in this process is to clean the walls to remove any grease, dirt, or other contaminants. This will help the paint adhere to the surface and prevent mold growth. It is also essential to properly prepare the drywall for painting, including sanding and priming.
It is essential to hire a reputable and experienced drywall contractor to complete the project. A professional crew will be able to work more quickly and efficiently than an inexperienced team. In addition, a seasoned crew can prevent mistakes that can cost you time and money.
When cutting drywall, it is important to follow the manufacturer’s instructions and use a utility knife or jigsaw with a sharp blade. It is also essential to use a level to check that the cut is straight. If the drywall isn’t straight, it can cause uneven gaps and a weaker structure.
After sanding the walls and taped joints, it is important to apply another coat of joint compound. It is also necessary to apply a skim coat for a smooth finish. After the mud dries, you can apply a coat of primer to the wall.
Installation
Drywall refers to a series of panels used to construct walls and ceilings in homes, commercial buildings and other structures. It consists of calcium sulfate dehydrate, a naturally occurring substance found in soil and other materials. It is also an ingredient in fertilizer, school blackboards and sidewalk chalk, as well as a common building material.
The process of installing drywall varies by project, but generally requires a skilled team with experience. The crew must adhere to construction safety protocols, use personal protective equipment and maintain a clean work environment. In addition, they must be able to properly plan the wall layout and work around electrical wiring and pipes.
Before starting the actual installation, the wall must be prepped for drywall. This includes ensuring all framing members are straight and aligned. It’s important to inspect each joist and stud for damage, rot or any other issues that could impact the final result. It’s also a good idea to install any necessary outlets and switches prior to beginning the installation, so that they are flush with the planned drywall surface.
Once the wall is prepared, it’s time to start hanging the drywall. First, measure the wall to determine its width and cut a drywall sheet to size using a utility knife and a drywall square. Then, use an assistant to hold the sheet tight against the ceiling and drive 1-1/4-inch screws into each stud at a convenient height.
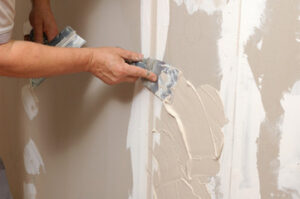
As you work, make sure each panel is properly positioned and centered over the window and door openings. Also, pay special attention to drywall corners and any areas where the panels meet or overlap. These areas are known as joints, and they must be butted together with a bedding coat of joint compound (more commonly called “mud”). Then, apply paper tape to the joints and apply two more coats of mud, feathering each one out for a smooth finish.
When the mud is dry, run a putty knife over any screw heads that broke through the paper face and set them below the surface of the drywall. Afterwards, apply a final skim coat and sand to smooth out any remaining rough spots.